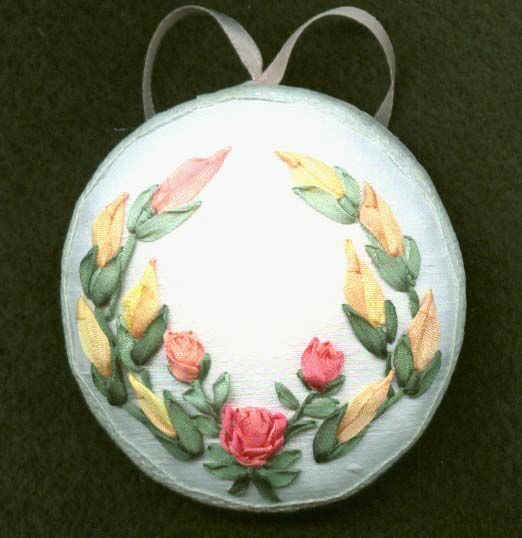
Pin Puff Instructions
Marie Alton -
© 2001

Pattern Notes:
Please read all directions through once before beginning this
project. I am
indicating the exact materials that I used, but you may substitute
whatever materials you wish to use.
The ribbon used is 3.5mm, but you may
use 4mm. If you do not have juice can lids, you may cut circles from
box board (not cardboard) or Quilter’s template plastic. I’ve used
a ribbon/lace combination for the trim, but you may use 1/4"
ribbon, gimp or cording . . . whatever you prefer.
Melanie Rose Buds:
Work the first six stitches only of the pattern.
Fly w/ Rolled stem:
Begin Fly stitch as usual, but when the thread is topside, roll the
needle between thumb and finger 5 or 6 time until the ribbon coils
into a spiral shape. Take ribbon down at end point, then allow the
ribbon to dangle freely, and it will uncoil.
At the base of the Lazy Daisy
Bullion-tip buds, work a straight stitch, wrapped three times, then
proceed with the other stitches afterward.

Materials Required:
 3" embroidery hoop
(rubber outer ring or bamboo type)
3" embroidery hoop
(rubber outer ring or bamboo type)
Size 18 Chenille needle
Size 7 straw or
embroidery sharp needle
2 - 5" x 5" -
Silk Duppioni (for stitched panel and back)
2 - 4" x 4" -
White Felt (for padding)
1 - 3" diam ball of
batting (for stuffing - wool/cotton/poly fill - your choice)
2 - Lids from frozen
juice cans (for forms)
1 yard VC* 3.5mm Silk Ribbon - Peach
1 yard VC* 3.5mm Silk Ribbon - Nectarine
½
yard VC* 3.5mm Silk Ribbon - Dark Green
1 ½ yards VC* 3.5mm
Silk Ribbon - Shades of Green
2 - 18" lengths of
strong thread (for gathering)
1 yard matching thread
(for joining front & back)
9" - 3/4"
double-edged pattern eyelet lace (for trim)
24" - 1/8"
Double Faced Satin Ribbon (for trim and hanger)
Hi - tack craft glue (to
attach trim)

Stitching Instructions:
Center 1 - 5" x
5" fabric on the 3" hoop. Transfer pattern and work
stitches in the order given on the legend.
Trim excess fabric at
outer edge of the hoop. Remove fabric from hoop.
Mount the second fabric
on the hoop and trim as above.
Using the outer edge of
the hoop as a template, mark a circle on each of the felt pieces,
and trim to size.
With the 18"
lengths of strong thread (#12 silk pearl used for this) work a
running stitch line ½" in from the cut edge on both the front
and back outside pieces.
Front Section:
Place the stitched panel face down on the surface in front of you.
Put the ball of batting over this, followed by the felt circle, then the
juice can lid. Push down to compress the batting, and gather the fabric
over the stack until fabric is taught. Knot the two ends of the gather
thread together.
Back Section:
Place the right side of the back fabric face down on the surface.
Next lay down the felt circle, then the juice can lid, and gather the
fabric over the lid. When fabric is taught, knot the ends.
Hanger Attachment:
Cut a 10" piece of 1/8" ribbon. Fold in half and knot the
two ends. Sew this end to the inside fabric of the back section at center.
Joining Front & Back
:
Match the wrong sides of the front and back, lining up the hanger at
top center. Use the matching thread and work in whip stitching or use
Cretan stitch around the perimeter.
Attaching Trim :
Thread and center a 12" length of ribbon through the 9"
eyelet lace. Beginning at top center, pull the hanger ribbon up through
one eyelet, and push the excess ribbon end down between the front and
back sections. Working a few inches at a time, spread an even bead of
glue on the outer edge of the Puff, and glue the trim in place,
stretching the lace to curve to the form. Finish at top by pushing the
left over ribbon end down between the front and back sections.
Allow glue to dry overnight.
Marie Alton - © - 2001