 Basic
Cast-on Stitch
Basic
Cast-on Stitch
This stitch adds wonderful dimension! Brazilian by nature, it is
highly adaptable to many variations. Different threads, placement
and number in the grouping can all be varied to create
stunning results. |
|
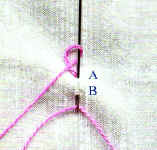 |
1. Begin by bringing thread up at A.
Insert needle tip at B and out again at
A, pushing the needle through so that just the eye remains topside at B.
Wrap thread across front of pointer finger and around the back of it to
form a loop (as in knitting). Insert the tip of the needle into the
loop, remove your finger, and pull the loop down to the base of the
needle (at A). |
|
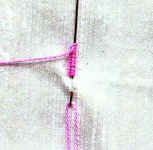 |
2. Continue adding Cast-on stitches
until you have the required number.
Hold the stitches on the needle flat to
the fabric with thumb topside and index finger underneath, and pull the
needle through and away from you until all of the thread is through the
Cast-on loops |
|
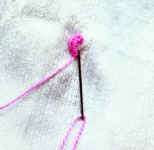 |
3. Slowly pull the needle/thread
toward you and slide the Cast-on wrap down the remaining thread toward
B.
Insert needle at B and pull all thread through the fabric. Give a firm
tug on the thread to "set" it.
This completes one Cast-on section . |
|

Cast-on
Stitch - Carnation:
|
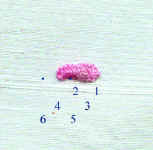 |
4. Begin at the top right
side of the point where your carnation will be.
Work the 1st section as shown in stitch instruction, then
work the 2nd section centered over the end point of the first
(shown as 2). Work the 3rd section centered over the end of
the 2nd section (shown as 4). |
|
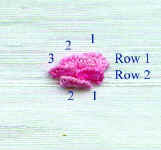 |
5. Begin the 2nd row below
the center of section 1 of Row 1.
Work 2nd section of Row 2 centered over the
end point of section 1.
6. To complete the flower, work one section below Row
2, centered over the two sections.
|
|
Carnation
Greenery:
|
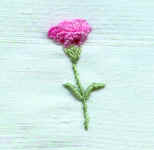 |
Work Satin stitch the width of the 3rd Row
section in a triangular shape. Make a running stitch line for the stem,
then whipstitch it to finish. Add two bullion stitch leaves as shown,
using a tacking stitch over the bullion to keep it in position.
|
|
|


