|


| |

[ Welcome ] [ Instructional Sites ] [ Stitch Directions ] [ Stitching Blogs ] [ Marie's Gallery ] [ About Me ]
[ The Melanie Rose ] [ The Alton Loop ] [ The Griffin Rosebud ] [ The Lazy Daisy ] [ Cast-On Stitch ]

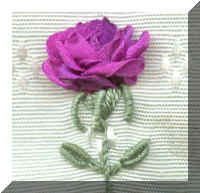
The Melanie Rose
The success of this stitch depends on
maintaining a loose tension on the ribbon. Allow the center stitches
to have extra fullness. Allow the Japanese stitches to roll at the
edges. Leave generous loops on the Rolled Stem stitches. Begin with a
12" length of ribbon for smaller blooms, and 14" for larger
blooms.
7mm ribbon requires 20" -
24"respectively. |
Click
on pictures for a detailed view of each stitch step
Use your Browser's Back button to return to this page
|
 |
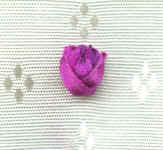
First Layer:
Straight Stitches
Work 1 stitch at center, 3/8"for smaller bloom,
or ½" for larger bloom . Work 2nd stitch 1/8" up
from bottom, work left to right, taking ribbon down beside end of first.
Work 3rd stitch opposite 2nd , right to left, with
down point beside center
|
|
|
 |
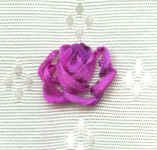
Second Layer:
Japanese Ribbon Stitches
Work three stitches:
1st - at center - take needle down through the
straight stitch, just below tip of the stitch.
2nd - bottom left to top right, going down parallel to
end of 1st Japanese stitch.
3rd - bottom right to top left, end parallel to 1st
|
|
|
 |
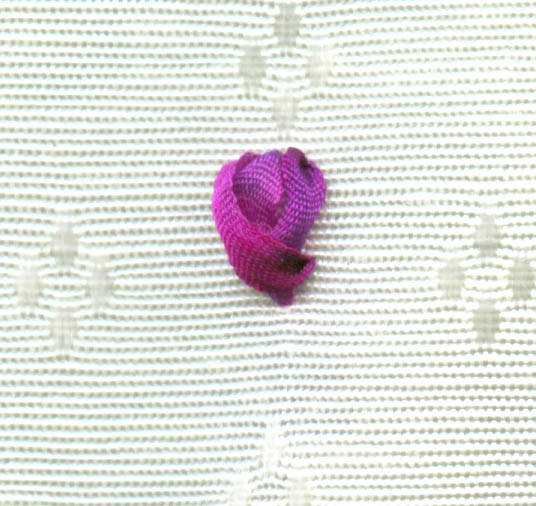
Rolled Ribbon Stem Stitch - 1st
row:
Bring ribbon up just left of the last stitch. Roll the needle
between thumb and finger 3 times clockwise. Work 5 stem stitches as
shown.
|
|
|
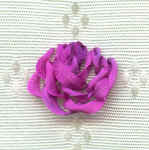 |
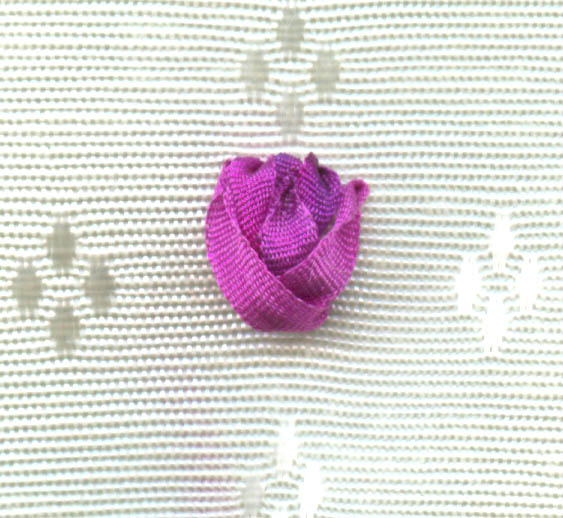
Rolled Ribbon Stem Stitch - 2nd
row:
Take ribbon up at ½ way point of 1st Stem
stitch, and work 4 stem stitches beneath 1st row as shown.
|
|
|
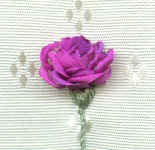 |
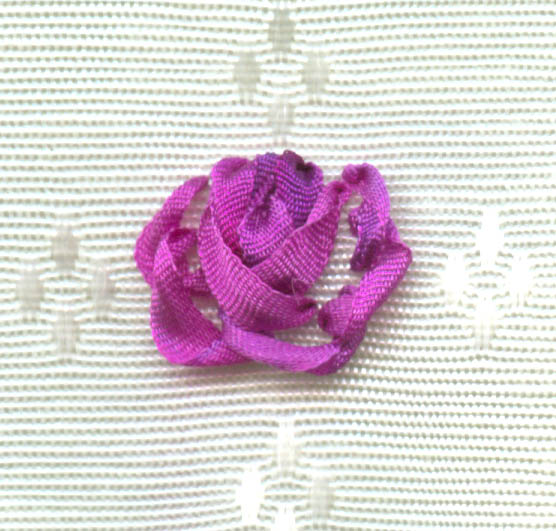
Push the Rolled Stem stitches upward from
base, and use blunt needle end to adjust inner stitches by lifting
upward / outward.
Rose Base & Stem:
Work satin stitch in area shown. Work stem stitch (or whipped
backstitch) along the line to be the stem.
|
|
|
 |
Sepals and Leaves:
Work Bullion Stitch at left, center, and right as shown. Work stem
stitch for leaf stalks, and two straight stitches for each leaf stem.
Work two bullion stitches for each leaf.
© Marie Alton 2001
|
|
|
|